
 You know that feeling when you have a craft product that you absolutely love, so much so that you can’t bring yourself to use it? Every crafter knows this feeling. It happens to me most times I have a new First Edition paper pad to play with and this launch was no different.
This week Trimcraft unveiled the brand new Wanderlust and Beyond The Shore First Edition papers and once again, they have excelled themselves and delivered a sensational collection of paper designs. Head to the Craft Blog to see more of the papers in closer detail.
The designers at Trimcraft have taken Kristin Cronin-Barrow and Katie Pertiet’s designs and put them in three paper pad sizes for us crafters to create wonderful things with, and it was the marble effect paper, with the striped pattern on the back that instantly caught my eye.

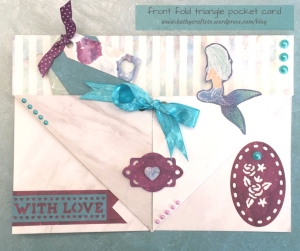
Front fold triangle pocket card tutorial using Beyond the Shore First Edition papers
I’ve been making cards with the papers for a few days now and have loads of ideas jotted down for projects I am going to make, but I wasn’t sure if I was going to be able to cut into this particular paper design such was my love of it.
In the end I had a word with myself and reasoned that there are three sheets of this stunning paper in the 12×12 pad, so using just one, in fact, half of one, would be fine.
So, I made it into a card shape I’ve been wanting to share for a while. I’ve named it a Front Fold Triangle Pocket Card but I am not sure whether that’s its official name. I’ve also seen it referred to as an envelope front card. Either way, it’s a cute card shape and something a little bit different.

I made one of these in the Dovecraft Magic of Christmas papers a while back and it worked really well with the collage paper design. I’ve also done a version in the new Wanderlust paper pad and again, it looks great (scroll to the bottom of this post to see it). It’s good to see how different each card looks depending on how you use the pocket and how you add embellishments to the card.
Here’s my step by step tutorial that you can follow to create the card yourself.
(Please excuse my very messy mat in the pictures. At least it’s authentic crafter!)
 Step One: Make the card blank by trimming a 12×12 paper down to 7 inches by 10 inches. Score in half to make a 7×5 card blank.
Step Two: Mark a point at 3.5 inches (the centre point) on the 7 inch edge.
Step Three: Fold the corner back diagonally using this point as a guide.
Alternate Step Three: Mark a point at 3.5 inches on the bottom edge of the card and 3.5 inches along each side. Score between the points on each side.
 Step Four: Fold both sides up.
Step Five: Make a hole in the corner, either with a punch or a small circle die.
 Step Six: Repeat to make a hole on the other side.
Step Seven: Fold corners up and tie together with a ribbon.
Step Eight: Embellish the inside of the card with die cuts and pearls.
 Step Nine: Die cut three tag shapes and join them together with ribbon. I used the First Edition tags dies pictured here (Hobbycraft product code 633700 and FEDIE165) . I also mixed these sets to create the die cuts for the inside of the card.
Step Ten: Add a tag in the centre, a fussy-cut mermaid and pearls to finish.

Front fold triangle pocket card using Wanderlust First Edition papers
I also made this card in the new First Edition Wanderlust papers. This time I covered the front triangle by fixing a piece of paper to the front, lining up an edge with the top of the triangle before trimming away the excess. This ensured the triangle was exactly the right size.
I then matted and layered papers from the pad for the inside of the pocket and the inside of the card. I used a Dovecraft sentiment stamp on the pocket front in red ink and topped it with pearl red heat embossing powders.
I fussy cut flowers and butterflies from the same pad and fixed them inside the pocket and on the front triangle. As always, I finished with a few pearls as I think they make all the difference.

Front fold triangle pocket card using Wanderlust First Edition papers
I hope you like this card shape and I look forward to seeing your take on cards using this technique. Please tag me when you share your makes. I’m Kathy Crafts TV on Instagram, Twitter and Facebook.

I’ve seen a few off your samples with this shape and love it, thank you for the nice clear tutorial
LikeLiked by 1 person
You’re welcome. It’s a nice easy one that makes something a bit different. Sometimes when giving cards to friends and family I feel a bit under pressure to make something out of the ordinary!
LikeLike